How To Splice A 15kV Cable Using 3M Mining Cable Splice Kit 3103
Published 20 May 2021

A series of How-To videos for repairing, jointing and terminating cables using 3M Cold Shrink & Scotchcast products.
This video by 3M Electrical shows how to splice a 15kV SHDC cable using 3M Mining Cable Splice Kit 3103 safely.
3M Mining Cable Splice Kit 3103 may be used for flexible conduit and mining jacket repairs, as well as for cable splicing and jointing mine and portable cable.
3M 3103 cable splices and joints are for use on 3-conductor mine and portable cables, type SHD-GC, MPF-GC and MPF; # 6 AWG-500 kcmil; 5kV, 8kV, 15kV.
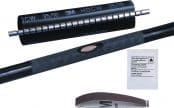
3M Mining Cable Splice Kit 3103 Kit Contents
- 2 rolls 3M Scotch 31 heavy duty mining cable tape
- 1 roll 3M Temflex 1700P vinyl electrical tape
- 3 rolls 3M Scotch 24 shielding tape
- 2 rolls 3M Scotch 2228 rubber mastic tape
- 2 CC2 Dry cable cleaning & preparation kits
- 3 rolls 3M Scotch 13 semi electrical conductive tape
- 3 rolls 3M Scotch 130C linerless rubber self-amalgamating tape – 1 ½” x 30 ft
- 3 rolls 3M Scotch 130C linerless rubber self-amalgamating tape – ¾” x 30 ft
Cable Preparation
Position cable end so that the colour rotation matches. Circle cut the cable jacket 12” from each end. Be sure not to damage the cable conductors. Measure 14” from the cable end and fully taper down to the circle cut.
Remove 12” of the cable jacket and cable fillers. Scuff and clean 4” of the cable jacket beyond the top of the taper. Hold back the grounds and ground check conductors and temporarily tape to cable with Temflex 1700P vinyl tape.
Select one conductor and cut at 9”. Match this conductor with the same colour conductor on the opposite end. Take the next conductor at 6”. Remove ¾” of the braid or tape metallic shielding from each conductor plus one half the connector length plus ¼”.
Remove cable semi con to ¼” of the shielding. Remove insulation for one half of the connector length plus ¼”. Pencil the insulation for ¾” and sand it smooth and even with electrical graded abrasive cloth.
Connecting Phase Conductors
Once the cable is prepared, join the power connectors with the proper connectors and cable crimping tool. Be sure the conductors butt up against the centre indents of the connector.
Note that ground wires and ground check will be joined later.
Applying Primary Insulation
Apply two highly stretched half lapped layers of Scotch 13 from the edge of one taper to the other, making sure to completely overlap the exposed semi conductive shield. Next apply highly stretched half lapped layers of Scotch 130C and up onto the tapers.
Build up half lapped layers building onto the existing insulation to 1/8” from the edge of the original cable semi con. The taper should be wrapped equal or greater than the original insulation.
Apply 2 highly stretched half lapped layers of Scotch 13 over the Scotch 130C overlapping the edges of metallic shielding.
Starting 2” up on the exposed metallic shielding wrap 1 half lapped layer of Scotch 24 over semi conductive tape continuing onto the opposite shielding for 2”.
Secure with a half inch square knot and trim the ends. Repeat connecting the phase conductors and applying primary insulation for the remaining phases.
Connecting Ground Connectors
Beforre cutting the ground wires reposition the spliced power conductors so that the conductors are returned to the natural helix of the cable. Lay the ground wires in their natural position in the valley between the two power conductors. Allow the ground to link staggered so as to avoid connection over the power conductor connections.
Join the conductors with the proper connectors and appropriate crimping tool. If present, connect the ground check conductor after trimming it to the proper length and remove one half connector length of the insulation from each lead.
On the ground check, clean the insulation 1” on both sides of the connection and apply one half lapped layer of 3M Temflex 1700P, one half lapped layer of Scotch 130C and one half lapped layer of 1700P over the connector and the clean insulation. Connect the remaining ground wires.
Jacketing The Splice
Bundle the cable assembly and bind it with 3M Temflex 1700P tape. Cover 1700P tape with one half lapped layer of Scotch 2228 and starting half way up the tapers, wrap half lapped layers of Scotch 130C building up and across the splice until the tape is equal to or greater than the original jacket thickness and extends 1” past the top of the jacket tapers.
Start 2” beyond the Scotch 130C tape and wrap one half lapped layer of Scotch 31 tape extending 2” beyond the 130C tape on the opposite end. Always wrap the Scotch 31 tape toward the machine end of the cable.
Start 1“ past the Scotch 31 and apply 3 half lapped layers of 3M Temflex 1700P to each end to temporarily secure the ends of the Scotch 31 tape jacket until the jacket reaches full bond.
Repairing Damaged Cable Jacket
Remove damaged cable jacket and taper the jacket approximately 2”. Scuff and clean 4” of the cable jacket beyond each split end. Bundle the cable assembly and bind with 3M Temflex 1700P tape.
Cover the Temflex 1700P tape with one half lapped layer of Scotch 2228. Wrap half lapped layers of Scotch 130C building up and across the splice until it is equal to or greater than then original jacket thickness and extends 1” beyond the top of the jacket tapers.
Start 2” beyond the Scotch 130C tape and wrap one half lapped layer of Scotch 31 tape extending 2” beyond the 130C tape on the opposite end. Always wrap the Scotch 31 tape toward the machine end of the cable.
Start 1“ past the Scotch 31 and apply 3 half lapped layers of 3M Temflex 1700P to each end to temporarily secure the ends of the Scotch 31 tape jacket until the jacket reaches full bond.

Cold Shrink – invented by 3M over 40 years ago and now the preferred technology for heat-free jointing, terminating, sealing and abandonment of LV HV cables
We hope you find this video informative and educational, contact T&D for technical support, quotations and stock availability for 3M Mining Cable Splice Kit 3103.
➡ Visit 3M Electrical for further information about joints, terminations, tapes and insulation to seal, repair, splice and connect LV MV HV cables.

Cold Shrink | Joint | Terminate | Seal | Repair | Splice | LV MV HV Cables | 3M
- 3M Electrical Products Stocked By Thorne & Derrick International