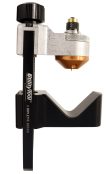
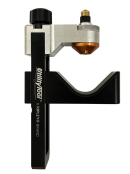
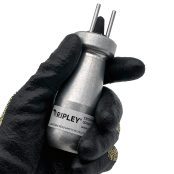
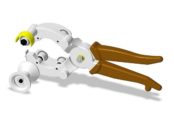
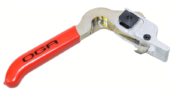
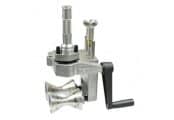
Ripley US16-7000 | Cable Sheath Jacket Stripping Tool LV HV

US16 | Cable Sheath Jacket Stripping Tool
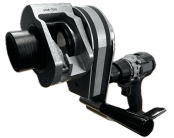
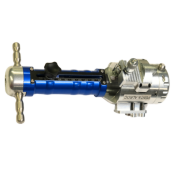
Ripley US16-7000 | Drill Operated Cable Sheath & Jacket Removal Tool
Professional, Safe & Consistent Stripping of Cable Sheath Jackets from LV MV HV Cables
Ripley US16 Cable Sheath Jacket Stripping Tool provides fast, safe, and precise cable sheath/jacket removal from both hard and soft insulated cables without damaging the underlying layers on LV MV HV (Low | Medium | High Voltage Cables).
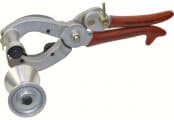
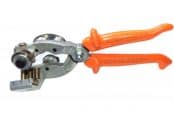
An innovative tool manufactured by Ripley Tools designed to remove cable outer jackets on medium voltage power cable with the assistance of a powered speed drill. Engineered with an ergonomic, self-feeding design and micro-indexing blade depth control, the Jointing & Preparation tool provides safe, efficient cable sheath and jacket removal from cables up to 1.5″ in diameter.
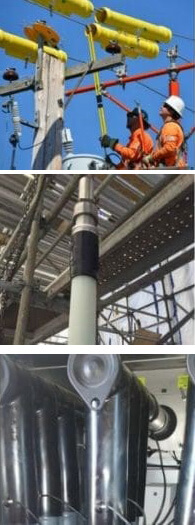
The incorporation of a drill, coupled with ergonomic design, makes jacket removal efficient and reduces physical strain of this strenuous task. The Ripley US16 is especially suitable for removing long lengths of JCN cable jacket, often needed for cable termination installation, including technologies in both heat-shrink and Cold Shrink.

Designed to remove outer jackets on medium voltage power cables
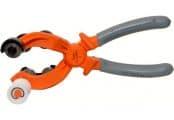
Ripley US16-7000 Cable Tool
Features
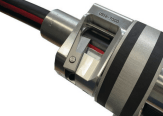
- Cable jacket is cleanly removed to expose cable shielding
- Micro indexing cutting blade depth control to protect cable shielding
- Self-feeding design to greatly reduce operator fatigue and strain
- Simple, safe blade depth adjustment
- Durable, reliable and built to last
- Ergonomic design prioritises user comfort and safety
- Suitable for stripping, jointing and termination of cable diameters up to 1.5″
| Part Reference | Item Description | Cable Diameter | Dimensions | Weight | Replacement Blade |
| Ripley US16-7000 | Drill operated jacket removal tool |
Up to 1.5″ | 13″ x 10.5″x 4.25″ | 4.55lb | US16-7500 |

 |
 |
 |
 |
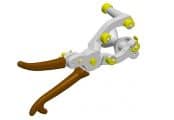
| An easier, safer way to strip power utilities cables | Designed by a linesman, for power utilities engineers | A self-feeding design reduces operator fatigue | Engineered with enhanced safety features |
Operating Instructions – URD Cable Jacket & Sheath Removal
1. Bushing Sizing & Selection
The Ripley US16 tool relies on an appropriate bushing fit and clearance to a cable’s actual outer diameter. We recommend to submit a 3 to 4 foot sample of your cable to the Ripley Tools engineering department for review and sizing. Ripley will best-size a bushing diameter that will allow for typical over/under cable variation. Generally, the cable allowance will normally be about 1/32”. Each bushing will be identified by conductor size and cable type for convenience in the field. In addition the bushing part number will stamped on the bottom side for ease of re-ordering.

2. Attach The Drill
Only use a variable speed, non-impact style drill. Lock the drill chuck onto the 3/8” drive stud in the Ripley US16 tool. Note that the lower bracket has up and down adjustment to obtain a proper fit with the drill and also provide maximum hand space to operate the tool. Loosen the (4) bracket adjustment screws, position the bracket until it meets and touches the top of the drill pack, then secure them tight.

3. Blade Adjustment
The US16 blade adjustment is the large knurled knob on the rotating head at the front of the tool. A right hand rotation, toward the – mark, will raise the blade. Le hand rotation Ā toward the + mark will drop the blade deeper. Adjust the blade upward out of the working zone. Raise the blade until the end of adjustment screw is flush with the top of the blade, as shown here.

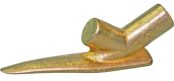
4. Attach The Bushing
Insert the bushing into the tool. Secure it with the spring plunger.

5. Cable Preparation
The cable condition is important when stripping with the US16 tool. Train the cable as straight as possible and ensure the cable end is cut off clean and square with a band saw, hack saw, or good pair of cable cutters that keeps a round form on the cable.
6. Set The Blade Depth
If available, use a scrap piece of the cable to set the blade. A start depth can be established by following these steps.
A. The blade should be out of the working zone from step 4 above.
B. Insert the cable into the bushing and slide it past the blade a couple of inches.
C. Drop the blade until it touches the cable. Then index it 2 or 3 more clicks deeper so there is some pressure on the jacket.
D. Remove the cable. Drag should be felt from the blade. The blade is typically set to around .020” above the cable shielding. This will allow the tool to make a clean strip of the jacket and also protect the shielding from damage.

7. Operation
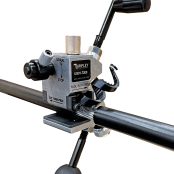
Re-insert the cable up to the blade. Run the tool slowly with light forward pressure to start the stripping operation. Carefully observe the strip performance. Re-set the blade to get the most reliable strip result. For long strips, stop the tool and trim the insulation chip. The tool can be manually backed off or run up against a stop clamp to end the stripping operation.
For an accurate strip length, note that the bushing extends exactly 2” past the blade cut. Add this 2” to the desired strip back length to locate the clamp. Avoid freewheeling with the tool. When the insulation chip breaks off, immediately stop the drill. Then extract the tool off the cable.

8. Blade Replacement
Rotate the blade adjustment knob in the “ – ” direction to continuously raise the blade until it unthreads off the adjustment screw. Carefully thread the new blade onto the screw.
Operating Instructions – Overhead Insulation Removal
Cable Bushing
In general, insulation removal is accomplished by the same procedure as jacket removal. Refer to the URD jacket removal steps 1-5.
1. Bushing selection. The US16 tool relies on an appropriate bushing fit and clearance to a cable’s actual outer diameter. This cable allowance will normally be about 1/32” and bushing sizing c an be referenced in the chart below.
2. Blade depth setting. Attach the bushing to the tool. Insert the cable up to the cutting blade. Adjust the cutting blade to 1/32 – 1/16” above the highest point of the conductor (Fig. A). On the initial blade setting, set the blade toward a conservative shallow depth to avoid injury, tool damage and cable damage. Make a short strip. Then, re-adjust appropriately if needed. A stripped cable remnant can be inserted into the tool to serve as a gage to assist in setting the depth (Fig. B).
3. Operation. Run the tool at a slow speed (75-150 RPM). As the insulation chip becomes too long, stop the tool and trim the chip. To end the strip process, manually back off the tool or use a stop clamp as mentioned on page 3.

| Cable | Bushing |
| 1/0 17kv 6/1 ACSR 165 mil | US16-7100-0775 |
| 336.4 MCM 17kv 18/1 ACSR 165 mil | US16-7100-1050 |
| 336.4 MCM 17kv 30/7 ACSR 165 mil | US16-7100-1125 |
| 653.9 MCM 17kv 18/3 ACSR 180 mil | US16-7100-1350 |
| 1/0 35kv 6/1 ACSR 165 mil | US16-7100-1075 |
| 336.4 MCM 35kv 18/1 ACSR 165 mil | US16-7100-1350 |
| 336.4 MCM 35kv 30/7 ACSR 165 mil | US15-7100-1425 |

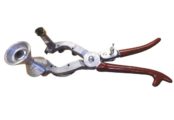
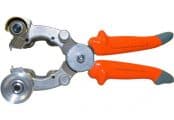
US16-7000 In Operation

Bonded Semicon US02-7000 | Sheath Jacket Removal US15 | Peelable Semicon SCS | Cable Stripper US01-7000 | Preparation & Jointing Tools for LV MV HV Power Cables & Fibre Optic